Monitoring blood sugar levels is an essential part of managing diabetes, whether you’re living with type 1 or type 2 diabetes, or you need to keep an eye on your glucose levels for any other health-related reasons. One of the most important tools for blood glucose monitoring is the blood sugar test machine, commonly known as a glucose meter. These small devices enable individuals to check their blood sugar levels conveniently at home, allowing for better control of their condition and proactive decision-making regarding diet, exercise, and medication.
In this article, we will walk through the process of using a blood sugar test machine effectively, understand the technology behind it, and explore some tips to ensure accurate results. Whether you’re new to blood sugar monitoring or looking for ways to improve your technique, this guide will provide you with the necessary steps and insights.
Understanding Blood Sugar Testing and Its Importance
Before diving into how to use a blood sugar test machine, it’s important to understand the purpose and significance of blood sugar monitoring.
Blood glucose levels fluctuate throughout the day based on factors such as food intake, physical activity, stress, medications, and insulin sensitivity. Regular testing helps individuals with diabetes ensure their blood sugar is within the target range and identify trends over time. With a glucose meter, people can detect both high and low blood sugar levels (hyperglycemia and hypoglycemia) early and take corrective action, such as adjusting insulin or consuming carbohydrates.
Effective monitoring of blood sugar is a key element in preventing complications such as cardiovascular disease, nerve damage, kidney damage, and vision problems—common long-term consequences of poorly managed blood glucose.
Types of Blood Sugar Test Machines
There are several types of glucose meters available on the market today, each with its unique features. While the basic function of each meter is to test blood glucose levels, the accuracy, ease of use, and additional features may vary.
Traditional Glucose Meters: These meters are the most common and rely on a blood sample collected through a fingerstick. The blood is placed onto a test strip, and the meter analyzes the sample to provide a glucose reading.
Continuous Glucose Monitors (CGMs): CGMs are more advanced devices that monitor blood glucose levels continuously throughout the day, typically through a small sensor inserted under the skin. CGMs are ideal for people with type 1 diabetes, offering real-time glucose readings and trend analysis.
Smart Glucose Meters: These meters are designed to sync with smartphones or other devices to track glucose readings. Some offer advanced features, including cloud data storage and integration with other health apps, making it easier to monitor blood sugar trends over time.
Non-Invasive Blood Glucose Monitors: Though still in development, these meters aim to measure blood sugar without requiring a blood sample. They use technologies such as infrared sensors or optical methods to estimate glucose levels. However, their accuracy is still being evaluated in clinical studies.
Step-by-Step Guide: How to Use a Blood Sugar Test Machine
Now, let’s walk through the process of using a standard glucose meter. This guide covers the typical steps involved, but make sure to follow any specific instructions provided by the manufacturer for the particular device you are using.
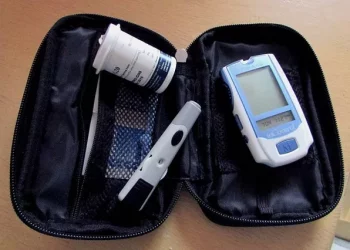
Step 1: Prepare Your Testing Supplies
Before using a blood sugar test machine, ensure that you have all the necessary supplies at hand:
Glucose meter: Make sure the device is clean and functioning properly.
Test strips: These strips are specific to your meter model, so ensure you have the correct ones.
Lancet and lancing device: The lancet is used to prick your finger to obtain a small blood sample.
Alcohol wipes (optional): Used to clean your fingers before testing.
Cotton balls or tissues: For wiping away blood or alcohol after the test.
Ensure that your meter is properly calibrated and the test strips are not expired, as this can impact the accuracy of your readings.
Step 2: Wash and Dry Your Hands
Proper hygiene is essential when using a blood glucose meter. Wash your hands thoroughly with soap and water before testing to avoid any contamination that could affect the test results. Dry your hands completely as moisture can interfere with the test strips.
Avoid testing with cold hands, as this can affect blood flow and lead to a less accurate result. If your fingers feel cold, consider rubbing them together or running warm water over them for a few moments.
Step 3: Set Up the Lancing Device
The lancing device is used to make a small, controlled prick in your finger to obtain a blood sample. Follow the instructions for your specific lancing device, which may allow you to adjust the depth of the lancet to suit your comfort level.
Insert a new lancet into the device and ensure that the device is set to the appropriate depth for your skin thickness. For most people, a shallow depth is sufficient.
Hold the lancing device firmly against the side of your fingertip and press the release button to make a small puncture.
It’s important to use the side of the finger, as the fingertip is more sensitive. Avoid using your index or middle fingers if possible, as they are used most frequently and can become sore. You may also want to rotate the fingers you use to test to avoid discomfort.
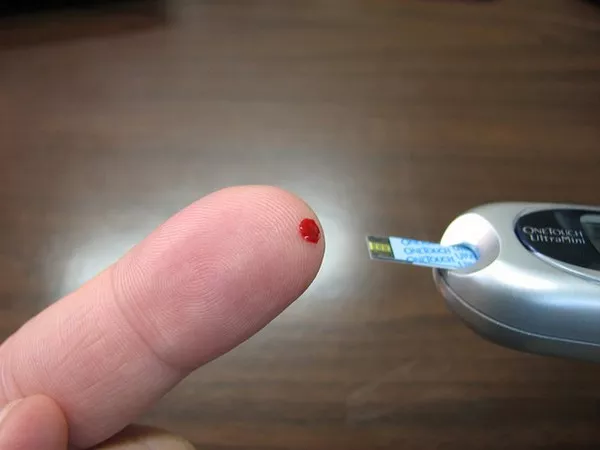
Step 4: Place a Drop of Blood on the Test Strip
Once the lancing device has pricked your finger, a small drop of blood will appear. Gently squeeze your fingertip if necessary to get enough blood for the test. Be sure to avoid pressing too hard, as this can affect the quality of the blood sample.
Immediately touch the drop of blood to the test strip inserted into the glucose meter. Most meters are designed to automatically pull the blood into the strip, so ensure the blood sample is in contact with the correct area of the strip.
Step 5: Wait for the Result
After applying the blood to the test strip, the meter will begin analyzing the sample. Most meters will provide a reading within 5–30 seconds, depending on the device model. While waiting, avoid moving the meter, as this can cause inaccuracies in the result.
The result will be displayed on the screen in units of milligrams per deciliter (mg/dL) or millimoles per liter (mmol/L), depending on the meter’s settings.
Step 6: Dispose of the Lancet and Test Strip Properly
Once the test is complete, it’s important to dispose of the lancet and test strip safely. Used lancets should never be reused, as this increases the risk of infection. Place the lancet and test strip into a designated sharps container to ensure safe disposal.
It’s also a good practice to clean your meter periodically, as dust, dirt, or blood residue can accumulate and affect performance.
Step 7: Record Your Results
Recording your blood sugar readings is an essential part of managing diabetes. Whether you use a logbook, a digital app, or your meter’s built-in memory, keeping track of your results will help you and your healthcare provider identify patterns and adjust your treatment plan accordingly.
Note the time of day when the test was taken, especially if you’re testing at different times (such as fasting, post-meal, or before bed). This will help provide context for interpreting the results.
Tips for Accurate Blood Sugar Testing
While using a blood glucose meter is straightforward, there are several tips that can help ensure the accuracy and reliability of your results:
Check Your Meter Regularly: Test your glucose meter with a control solution to ensure it’s working correctly. Control solutions are available for most meters and help confirm that the device is reading within the proper range.
Use Fresh Test Strips: Always use test strips that are within their expiration date. Once a bottle of test strips is opened, ensure you use them within the time frame indicated on the packaging.
Avoid Storing Test Strips in Humid Environments: Humidity can affect the accuracy of test strips, so store them in a cool, dry place. Avoid leaving them in the bathroom or near sources of moisture.
Rotate the Fingers You Use: To avoid soreness or discomfort, rotate between different fingers when testing. If one finger becomes sore, wait until it heals before using it again.
Don’t Reuse Lancets: Reusing lancets can increase the risk of infection and make the test less comfortable. Always use a new lancet for each test.
Test at the Same Time Each Day: To get the most consistent readings, try to test your blood sugar at the same time each day, preferably when you’re in a similar state (e.g., fasting in the morning).
Troubleshooting Common Issues with Blood Sugar Test Machines
Though glucose meters are generally reliable, issues can arise from time to time. Here are some common problems and how to troubleshoot them:
No Blood Sample: If the meter says there’s not enough blood, try gently squeezing the finger to release more blood. Alternatively, prick a different finger.
Erroneous Readings: If you suspect the reading is inaccurate, double-check your meter’s settings, make sure the test strip is inserted properly, and confirm that your hands are clean and dry.
Meter Malfunctions: If your meter displays an error message or malfunctions, check the batteries and ensure the device is clean and free from dirt or blood buildup.
Conclusion
Using a blood sugar test machine is a crucial skill for individuals managing diabetes or anyone who needs to keep their blood glucose levels in check. By following the correct steps for testing, ensuring accurate readings, and recording your results, you can effectively monitor your blood sugar levels and take control of your health. Regular monitoring can help you make informed decisions about your diet, exercise, and medication, ultimately leading to better long-term health outcomes.
Taking the time to understand your glucose meter and use it correctly can significantly enhance your ability to manage your condition and prevent complications. Always consult with your healthcare provider for advice on how often to test and the target range for your blood glucose levels.
Related topics:
When Should a Diabetic Take Their Blood Sugar?